Many of the routers on the market support third-party router firmware like DD-WRT or OpenWRT. These firmware add additional functionalities to you router if your network is more complex than a single flat network. It also allow you to tinker with many advance settings to customize for your needs.
One such usage is to use DD-WRT to create multiple VLANs and link them together. This was done for a client when they have 3 VLANs from a legacy setup, but needed each VLAN to talk to each other. I know it does seem counter intuitive since the usage of VLANs is to segregate your network into different segments, but for the case reverse engineering it allows 3 separate networks to talk to each other.
I assume you already have already installed DD-WRT on your router. If not, you can read my guide here on how to do so.
Go to http://192.168.1.1/ (or your router management IP address) in your web browser.
Select Setup -> VLANs.
Uncheck ports 1, 2, 3, and 4. Place port 1 into VLAN1, port 2 into VLAN2, and port 3 into VLAN3, port 4 into VLAN4. Set the WAN port to VLAN0.
When this is done, the VLAN configuration page should look like this.

Click Save, then Apply Settings.

VLAN CONFIGURATION ON EACH PORT
- Next, plug an Ethernet cable into port 1 on the router from your computer.
- Unplug the router power for 30 seconds and then plug it back in. Wait for the lights to return to normal.
- Go to Setup -> Networking.
In this tutorial, we will create a subnet for each VLAN.
VLAN1 will have the subnet 192.168.1.0. VLAN2 will have the subnet 192.168.2.0. VLAN3 will have the subnet 192.168.3.0. VLAN4 will have the subnet 192.168.4.0.
That means devices on VLAN1 will be assigned addresses such as 192.168.1.15 and for VLAN2 192.168.2.50
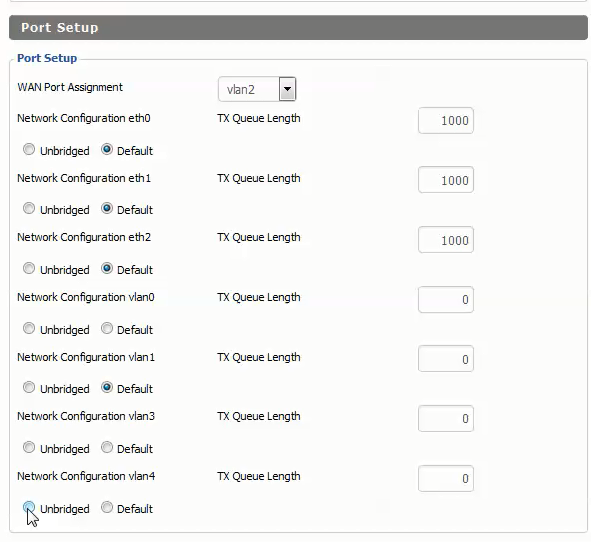
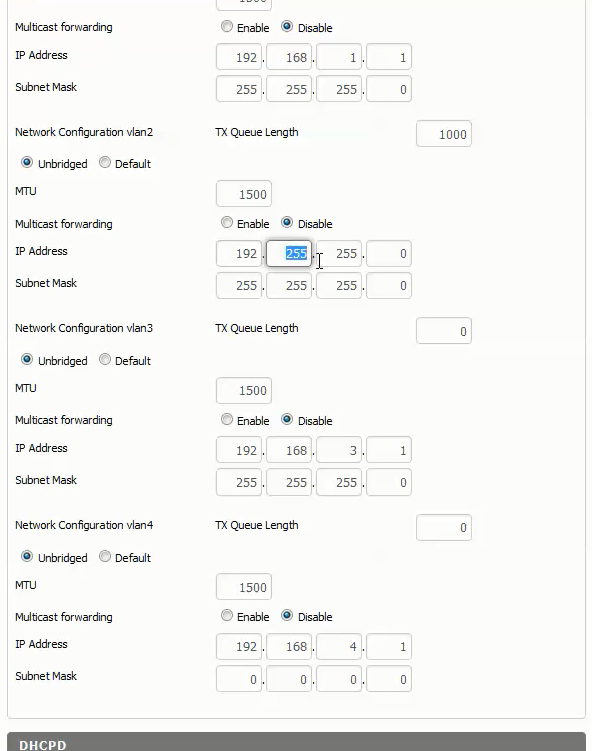
Under Port Setup
Set VLAN1 to Unbridged.
Set the IP Address to 192.168.1.1. Set the Subnet Mask to 255.555.255.0
Change VLAN2 to Unbridged.
Set the IP Address to 192.168.2.1. Set the Subnet Mask to 255.555.255.0
Change VLAN3 to Unbridged.
Set the IP Address to 192.168.3.1. Set the Subnet Mask to 255.555.255.0
Change set VLAN4 to Unbridged.
Set the IP Address to 192.168.4.1. Set the Subnet Mask to 255.555.255.0
Save your changes by clicking Save. When the interface responds, the Port Setup section should look like this.
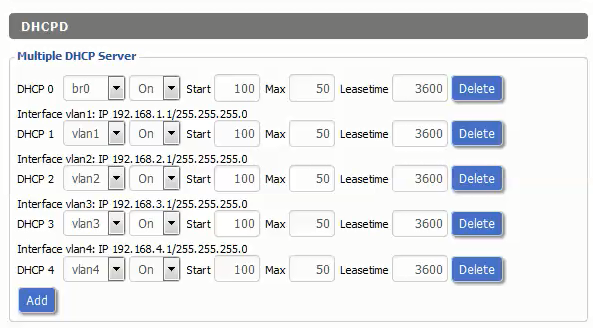
Below the Port Setup area you will see a section titled DHCPD.
What this area does is allow you to create multiple automatic assignment addresses for IP addresses in a network. So whenever someone authenticates into this section, this VLAN will assign it a user address in your network. This is create 4 sets of automatic assignments within the 4 new segments of your network to be handled by the router automatically in the future.
Under DHCPD click Add. Set DHCP 0 to vlan0 with a Leasetime of 1440 (24 hours). Click Save.
Click Add again. Set DHCP 1 to vlan1 with a Leasetime of 1440 (24 hours). Click Save.
Under DHCPD Click Add. Set DHCP 2 to vlan2 with a Leasetime of 1440 (24 hours). Click Save.
Once again, Once again,Set DHCP 3 to vlan3 with a Leasetime of 1440 (24 hours). Click Save.
And a final time, click Add. Set DHCP 4 to vlan4 with a Leasetime of 1440 (24 hours).
Click Save. Let it save. Then, click Apply Settings.
Once completed, the DHCPD -> Mutliple DHCP Server section should look like this:
Plug your Ethernet cable into any port on the router aside from port 4 or the WAN port. Unplug the power for 30 seconds and then plug it back in. Wait for the lights to return to normal.
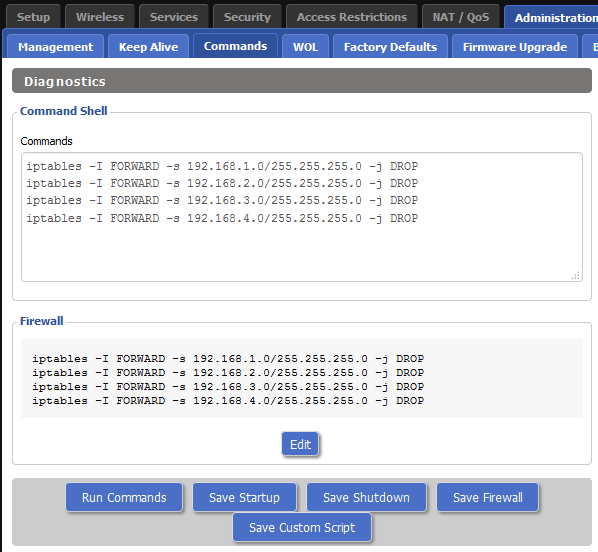
ADDING FIREWALL RULES TO ISOLATE THE VLANS.
Now we have created 4 network segments but we need to use a firewall to fully isolate them from each other. These commands block all VLANs from communication with each other.
Browse to Administration -> Commands.
Copy and paste the following commands into the Commands text box:
iptables -I FORWARD -s 192.168.1.0/255.255.255.0 -j DROP
iptables -I FORWARD -s 192.168.2.0/255.255.255.0 -j DROP
iptables -I FORWARD -s 192.168.3.0/255.255.255.0 -j DROP
iptables -I FORWARD -s 192.168.4.0/255.255.255.0 -j DROP
Click “Save Firewall”.
Your DD-WRT VLAN basic configuration is now complete.
Testing the VLAN DD-WRT Setup
To test each VLAN, connect to that wireless network and/or respective port. Take note of the IP address allocated if in your network connection summary. If it changes accordingly to the different VLAN (eg, Port one you get a 192.168.1.x IP, Port 2 you get a 192.168.2.x IP), you have correctly setup VLANs. Sweet!
Would you mind revisiting and updating this article to the newest version of DD-WRT? The UI has completely changed and an update would be extremely helpful for someone learning for the first time!
Additionally, if you could mock-up the scenario 1 routable VLAN that can get to the internet but no other subnet (including WiFi), and 1 non-routable VLAN that can only communicate with itself (nothing on the WiFi network, nothing else on the router, and nothing on the internet/WAN).
This would cover most use cases for home and small business and would be very helpful!